Monday 19 December 2011

5 MORE DAYS...

Hi readers !!! Been a few days since I last posted. Been madly making and writing and posting cards and parcels off - no doubt none of which are going to arrive on time!!! Christmas is a crazy 5 days away, so I wanted to wish each and every visitor to my fledgeling blog a VERY MERRY CHRISTMAS AND A HAPPY NEW YEAR! However you celebrate or tolerate the season, I hope its a good one.  Enjoy each moment you spend with loved ones as they can be suddenly taken away as happened with my mum in May this year. I never got to say goodbye. So this time of the year, especially this christmas, is a bitterweet celebration for me.

I have just a few more cards to show you before I spend some much needed time with my little family peparing for Christmas here in Alice Springs.
This stamp is one of my all-time favourite ones especially when making aussie-themed cards.  The background has been stamped with 2 different 'scenery' stamps and inked with sponges and watercolour pencils.


This one is fairly self-explanatory except I will mention that in an earlier blog I used different colours.


Every year I have to make 1 or 2 door-with-wreath cards!  I got the look of wood by just dragging the classic inkpad vertically down the cardstock several times, putting slight pressure on one edge of the inkpad to get the 'woodgrain' effect.
Also sponged the edges of the door panels for extra depth.


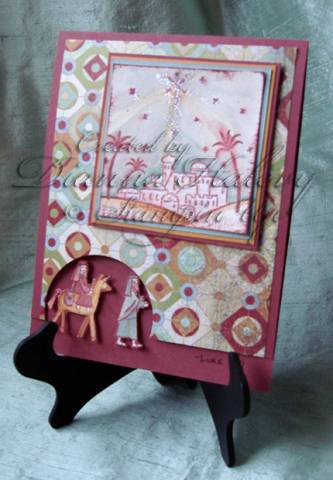
Had a lot of fun playing with this one!  I've never used these stamps quite like this before.


Have to say these landscape or scenery stamps have got me hooked!!!  Glossy cardstock gives a much more vibrant and exciting look. All the colours have been sponged over the inital stamped images. Eg., the sky was first stamped in night of navy, then sponged ,once dried, with not quite navy and a light touch of night of navy.  The rest was stamped in garden green then sponged with more mustard and the path highlighted with cajun craze.  The tree in the foreground was added last and inked with always artichoke and early espresso.  This was my favourite card in this batch. Looked really good IRL!(even if I say so myself!!!!)


Similar technique to the previous card - just monotone on the central image.

Awwww! Isn't the kanga cute!

Thought I'd finish off with another card using my favourite Sturt Desert Pea
 stamp. These gorgeous natives grow everywhere in the Alice, but are really native to South Australia.  Takes a bit of time and effort to cut these out but is sooooo  worth it, don't you agree?

That's all folks, will try to post soon. Best thing to do is to subscribe via email to this blog(see right hand side), so each time I post you will automatically be  advised in your in-box.  Don't be shy, leave some feedback or comment - I answer each one individually at this point!!

Merry christmas and a Happy 2012!!

Vi

Monday 5 December 2011

More Christmas!

Hi Bloggers!

Had a customer request for some cards from our pastor's wife . Worked late at night completing these, so my photos don't really do them justice. They all look so much better IRL.


The next one was one of my favourites and came together rather quickly. Love that embossing folder,  called Framed Tulips by SUP!  Cardstock used - night of navy and brocade blue (retired sup!)


Another card I liked is a CASE of this card by Diana Halevy


CC91/CITY OF DAVID

 In my version, though you can't really tell from the photo at first glance , I actually stamped the City of David (retired) first on the sage shadow cardstock(retired) and then on very vanilla cardstock. Then I very carefully cut out the city following the outline and adhered that to match with the palm trees on the sage shadow.  Also I only used a single clear rhinestone on the star rather than glitter as used on the original. Another change I made was that I matted the image onto more mustard rather than the marina mist - seemed to pop up more. The bottom of the card,  I just trimmed approx 11/2 cm off , then punched out a portion of a 1 3/4" circle and using the stamp-a-majig stamped Joseph and Mary  directly in the space of the partial circle.   In the original she stamped and cut out Joseph and Mary and then popped them up  - too much work for the time frame I had but soooo effective!!!  Also I used a different greeting -it's  from  the Tidings Of Joy set.

In an upcoming post I will explain what CASE-ING is for those of you who are unfamiliar or unsure of the term.

Lastly......will just mention that I adhered the cajun craze strip to the Crumb Cake card base before I embossed with the gorgeous Square Lattice embossing folder.

Hope you all enjoyed the post! 

Vi

Saturday 3 December 2011

Christmas - simple cards - some CAS!

Hi everyone

Its after midnight on a Saturday 3 weeks to go before Christmas and i'm finding that as each  day passes my cards are getting more and more simple and one-layered.  Technically some are not CAS (Clean and Simple) as I love a bit of grunge here and there!  Most were inspired by the embellishment or the embossed image sitting waiting to be used.  Let me know what you think.
Here goes;)


Easy peasy with the SUP! ornament punch.

With this one I stamped the portion with the camels a 2nd time and popped it up with dimensionals.  Was trying to use up some retired Purely Pomegranate cardstock and the matching ribbon teamed with a pre-embossed piece of Marina mist cardstock.  Mmmmmm...... not my favourite card, I have to say!

This one did not photograph very well - probably because of the shimmery cardstock and shiny decoration. I used a star brad to attach the bell to the card so that it can be removed and hung on a christmas tree if so desired.

Another very easy and definitley not 'clean' card - went a bit grungy with the silver pigment ink over the raised portion of the embossed surface.!!   Then to add extra dimension I used some silver star mini brads from my stash to complete.


Basically a one layer card with the oval shape masked and inked with Cherry cobbler and finished with matching seam binding ribbon.


And lastly a very simple card .  Not sure if you can see, but the reindeer is very glittery, so I didn't want to make the card too busy. The reindeer is so much better in real life!!!

So, there you have it - a few more Christmas cards.  Hope you find some inspiration!
Happy christmas card making!!!
Vi


Wednesday 30 November 2011

40th

Hi there!

Didn`t expect to post so soon , but had to share this card I made for a dear friend who celebrated her 40th today.    I've already given it to her, so its safe to publish!!
It's  really a spin on the stairstep fold known as the sidestep fold.  Just wanted to show the potential of these different card bases.   I love purple - especially this cardstock from Stampin' Up! called Concorde Crush (don't you just love the names of their colours?) The patterned paper and matching diecuts plus doily and flower are non SUP! product though.  So, without further ado, here goes:

Another angle:


This shows the steps more clearly -so basically its half a stairstep and half an A-fold card!  One piece of cardstock though.
This does not fit into a C6 envelope - just so you know!

Feel free to ask any questions in the comment box.

Ps -  I did not invent this fold - I discovered the design on the net.
PPs - Another very dear friend of mine is a SUP! demonstrator so if you need to know more about their awesome products , workshops or classes , she will be happy to help you at:    http://www.stampinup.net/esuite/home/debbieblake/
Til next time!

Vi

Tuesday 29 November 2011

Stairstep Fold

Hello everyone!
Been absent from my blog for a few days after a very hectic weekend and last 2 days of cardmaking, markets, scholarship auditions, church card drive and general mum duties!  But before I start babbling on, here is a card I wanted to share showing another favourite card style - the STAIRSTEP FOLD or stairfold ............. Great for that special occasion and for those special people who appreciate a keepsake.

I was aiming for a fairly rustic look with a teeny weensie bit of elegance, hence the pearls. Love crocheted lace of all kinds as well as  doilies - paper and crocheted varieties!  At the moment there seems to be a proliferation of doilies everywhere - not everyone's cup of tea, I know.  I love this style of card base as it lends itself to either a really clean and simple look or you can make the most elaborate production introducing all kinds of themes or stories.  For example underwater theme, beach scene, nativity scene, sunset or silhouette scenes, milestone birthdays and anniversaries etc.  There are a few places on the net with instructions for the dimensions, depending on the size of cardstock you're using just adjust the measurements. My most common measurements are for a 11 3/4"x 6" ( 29.8cm x 15.2cm)  piece of cardstock scored at:
1 1/4"( 3.2cm),     2 1/2" (6.4cm),   4  1/2"(11.5cm),   6 1/2"(16.5cm) and   9 1/8"(23.2cm)
Its not rocket science to figure out how to fold into peaks and valleys.

Here is another example from a while ago using a black base as a contrast to the very pinkiness(?) of the flowers!

Hope you enjoyed this latest instalment.  I will be back in a few days with another post.  Off to celebrate a birthday with a dear friend tomorrow! 
Happy 40th Lisa!

Vi

Thursday 24 November 2011

Cards as promised

The masking on the Northern territory cutout was done using the backing of a flocked sticker - love recycling! Some things are worth hanging on to.  The seriously textured handmade paper was from a very good friend of mine - a telented papercrafter!


This close-up shows more clearly the masking technique used for the "hills" with 3 inks and a sponge - really just a roughly torn piece of paper placed at various angles that look good.


Torn tissue, mulberry and cotton papers always give such a soft texture to rustic cards - looove using this technique!!


Merry Christmas from our mob to your mob!!! Very Territorian.....

more tearing........

Same card - just different angle.


Well there you are,  a few more aussie themed christmas cards.  I love texture and I also love clean and simple designs  - depends on the mood i`m in !!!

Have a good one!!

Vi

Thank You

A big THANK YOU to all of you who visited my blog and offered so much practical advice and help and some blog lovin'!!! I have learned so much in the last 24hrs and no doubt that will continue! I`d love it if you keep doing so - words cannot express my appreciation!!

Will try to upload a few more cards today - but time is short as my daughter has a music scholarship audition this afternoon for the high school she starts at next year.  Also I have markets this Sunday and a church card drive that I'm supervising on Monday -  too much fun and not enough time!!! A nice problem to have though!!!!

Vi